Description
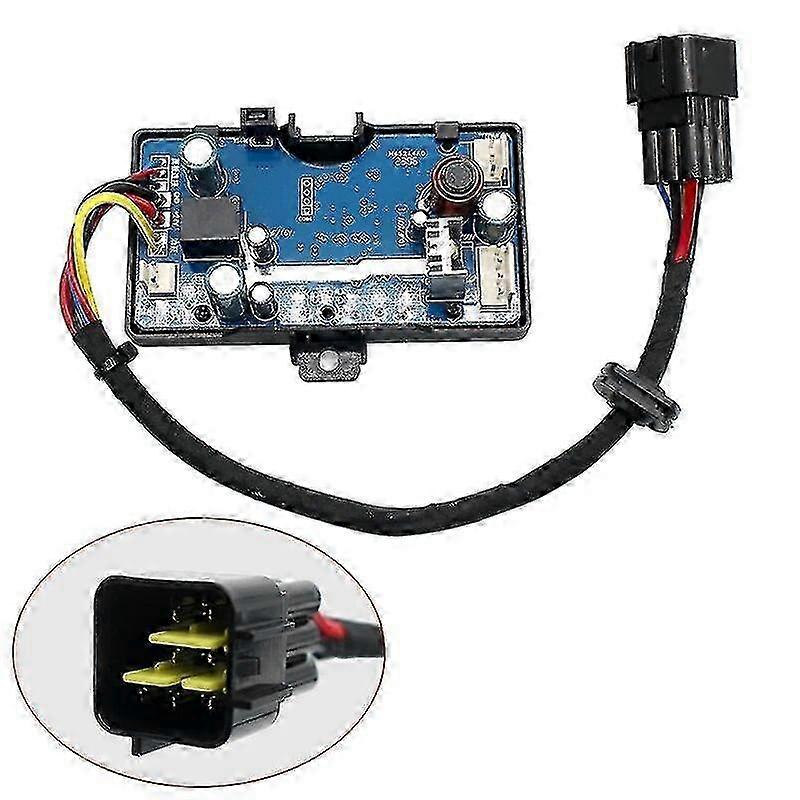
Diesel Parking Heater Mainboard Suitable for 3KW-8KW 12V/24V LCD Remote Control Switch Accessory Set
①. Note: Since the logistics rejects all items with batteries, we can only remove the battery from the remote control. After receiving the packaging, please purchase the remote control battery yourself, we apologize for this! The battery specification is 3V button cell of CR2032/A27.
②. Package Included: Or 1x LCD Switch & Remote; Or 1x Mother Board; Or 1x Wire harne; Or 1x Remote; Or 3PCS SET 1x LCD Switch & Remote & 1x Mother Board; Or 5PCS SET 1x LCD Switch & Remote & 1x Mother Board 1x Wire harne 1x Temp sensor.
③. Specification: Color: like the pictrue show; Remote distance: Within 10m; Voltage: 12V/24V; LCD Connector pin: 3 Pins Triangle Plug; Remote Control: 4 Button; Battery: 1PC 27A12V, INCLUDED.
④. Fitment: For 3KW 5KW 8KW Air Diesel Parking Heater.
⑤. Important Note: 1. There is a transparent plastic protective film on the screen that can be removed before using. 2. If your original motherboard and controller look the same as ours, all black plugs, then you can buy a motherboard or a controller to replace your broken one. If your original motherboard and controller are different from ours, you need to buy motherboard and controller together to replace your broken ones. Or it will not fit for your heater. 3. The remote key only fit for our controller and motherboard. If you need to buy a set of controller, remote key and motherboard, please choose 3PC SET. If only LCD Switch & Remote is selected, the motherboard is not included; if only Mother Board is selected, the controller and remote key are not included. Please don't make a wrong order! Please don't make a wrong order! Please don't make a wrong order!
⑥. Remote Control To Code instruction: 1. Pressing the up button to hold more than 3 seconds while in the off setting state. 2. Entering the remote control to the code interface until displaying HFR-. 3. Pressing the up button of the remote to launch the remote code. 4. The heater is on after the remote code disappear, or it won't turn on if the code failed. 5. The code will automatically exit when it is over time.
⑦. The parameter setting process (press the setting key to enter the setting state): 1. Time setting: Press the up or down key to adjust the parameters, set the hour (24-hour clock), minutes and other parameters in turn, press the enter key to confirm the parameters, and enter the next item. 2. Timing power-on setting: default off, display 1oF press the up key to turn on display 1oN, press the enter key to enter, set the hour and minute in turn. Timing is a countdown mode, up to 99 hours and 59 minutes. 3. Timed shutdown setting: default off, display 2oF press the up key to turn on display 2oN, press the enter key to enter, set the hour and minute in turn. Timing is a countdown mode, up to 99 hours and 59 minutes. Management password input: Press the up and down keys to adjust. When the correct value appears, press the confirm key to enter the next digit. After the 4-digit password is entered correctly, press the confirm key to enter the next item. If the input is wrong, it will return to waiting for the first digit to be entered. There is no need to modify subsequent data, press the SET button until exiting, or wait for 10 seconds to exit automatically. 4. Pump oil volume setting: Press the up or down key to modify the minimum pump oil volume. After reaching the required value, press the confirm key to enter the maximum oil volume setting; press the up or down key to modify the maximum pump oil volume. After reaching the required value, press the enter key to enter the next item. 5. Fan speed setting: press the up or down button to modify the minimum fan speed, after reaching the required value, press the enter button to enter the maximum speed setting; press the up or down button to modify the maximum fan speed, after reaching the required value, press the enter button to go to the next item. 6. Working voltage setting: The working voltage of the motherboard can only be selected in the shutdown state. Press the up or down key to switch and set the working voltage, adjust the 12V system to display U-12, The 24V system is adjusted to show that U-24 has completed the release. Pay attention to check whether the oil pump, motor and ignition plug of the machine are matched before starting the machine to avoid damage. 7. Speed signal selection: display 5N-1 Press the up or down key to set the speed signal, select 5N-2 if the two magnets of the impeller have the same polarity, and select 5N-1 when the polarity of the magnets is different or there is only one magnet (default value). If this parameter is selected incorrectly, the speed will be doubled. 8. Ignition plug power selection: display PF-5 Press the up or down button to modify the value (1=35W, 2=40W, 3=45W, 4=80W, 5=85W, 6=90W) The default value is 5. It is recommended to use the default value, or modify it after verification. 9. Management password modification: Initially display the oF state, press the confirm key to skip.
-
Fruugo ID:
416365073-878593512
-
EAN:
6902258039860
Product Safety Information
Please see the product safety information specific to this product outlined below
The following information is provided by the independent third-party retailer selling this product.
Safety Warnings:
Please ensure your children use this product under adult supervision to ensure their safety.